PIONEER CORPORATION
1-1, Shin-ogura, Saiwai-ku, Kawasaki-shi, Kanagawa 212-0031, JAPAN
PIONEER ELECTRONICS (USA) INC.
P.O. Box 1540, Long Beach, California 90801-1540, U.S.A.
TEL: (800) 421-1404
PIONEER EUROPE NV
Haven 1087, Keetberglaan 1, B-9120 Melsele, Belgium/Belgique
TEL: (0) 3/570.05.11
PIONEER ELECTRONICS ASIACENTRE PTE. LTD.
253 Alexandra Road, #04-01, Singapore 159936
TEL: 65-6472-7555
PIONEER ELECTRONICS AUSTRALIA PTY. LTD.
5 Arco Lane, Heatherton, Victoria, 3202 Australia
TEL: (03) 9586-6300
PIONEER ELECTRONICS OF CANADA, INC.
340 Ferrier Street, Unit 2, Markham, Ontario L3R 2Z5, Canada
TEL: 1-877-283-5901
TEL: 905-479-4411
PIONEER ELECTRONICS DE MEXICO, S.A. de C.V.
Blvd. Manuel Avila Camacho 138 10 piso
Col. Lomas de Chapultepec, Mexico, D.F. 11000
TEL: 55-9178-4270
© 2012 PIONEER CORPORATION.
All rights reserved.
© 2012 PIONEER CORPORATION.
Tous droits de reproduction et de traduction
réservés.
Printed in China
Imprimé en Chine
<231.0005150Y> EL<KYTNX> <12G00000>
Owner’s Manual
Mode d’emploi
UNIVERSAL REAR-VIEW CAMERA
CAMERA DE RECUL UNIVERSELLE
ND-BC6
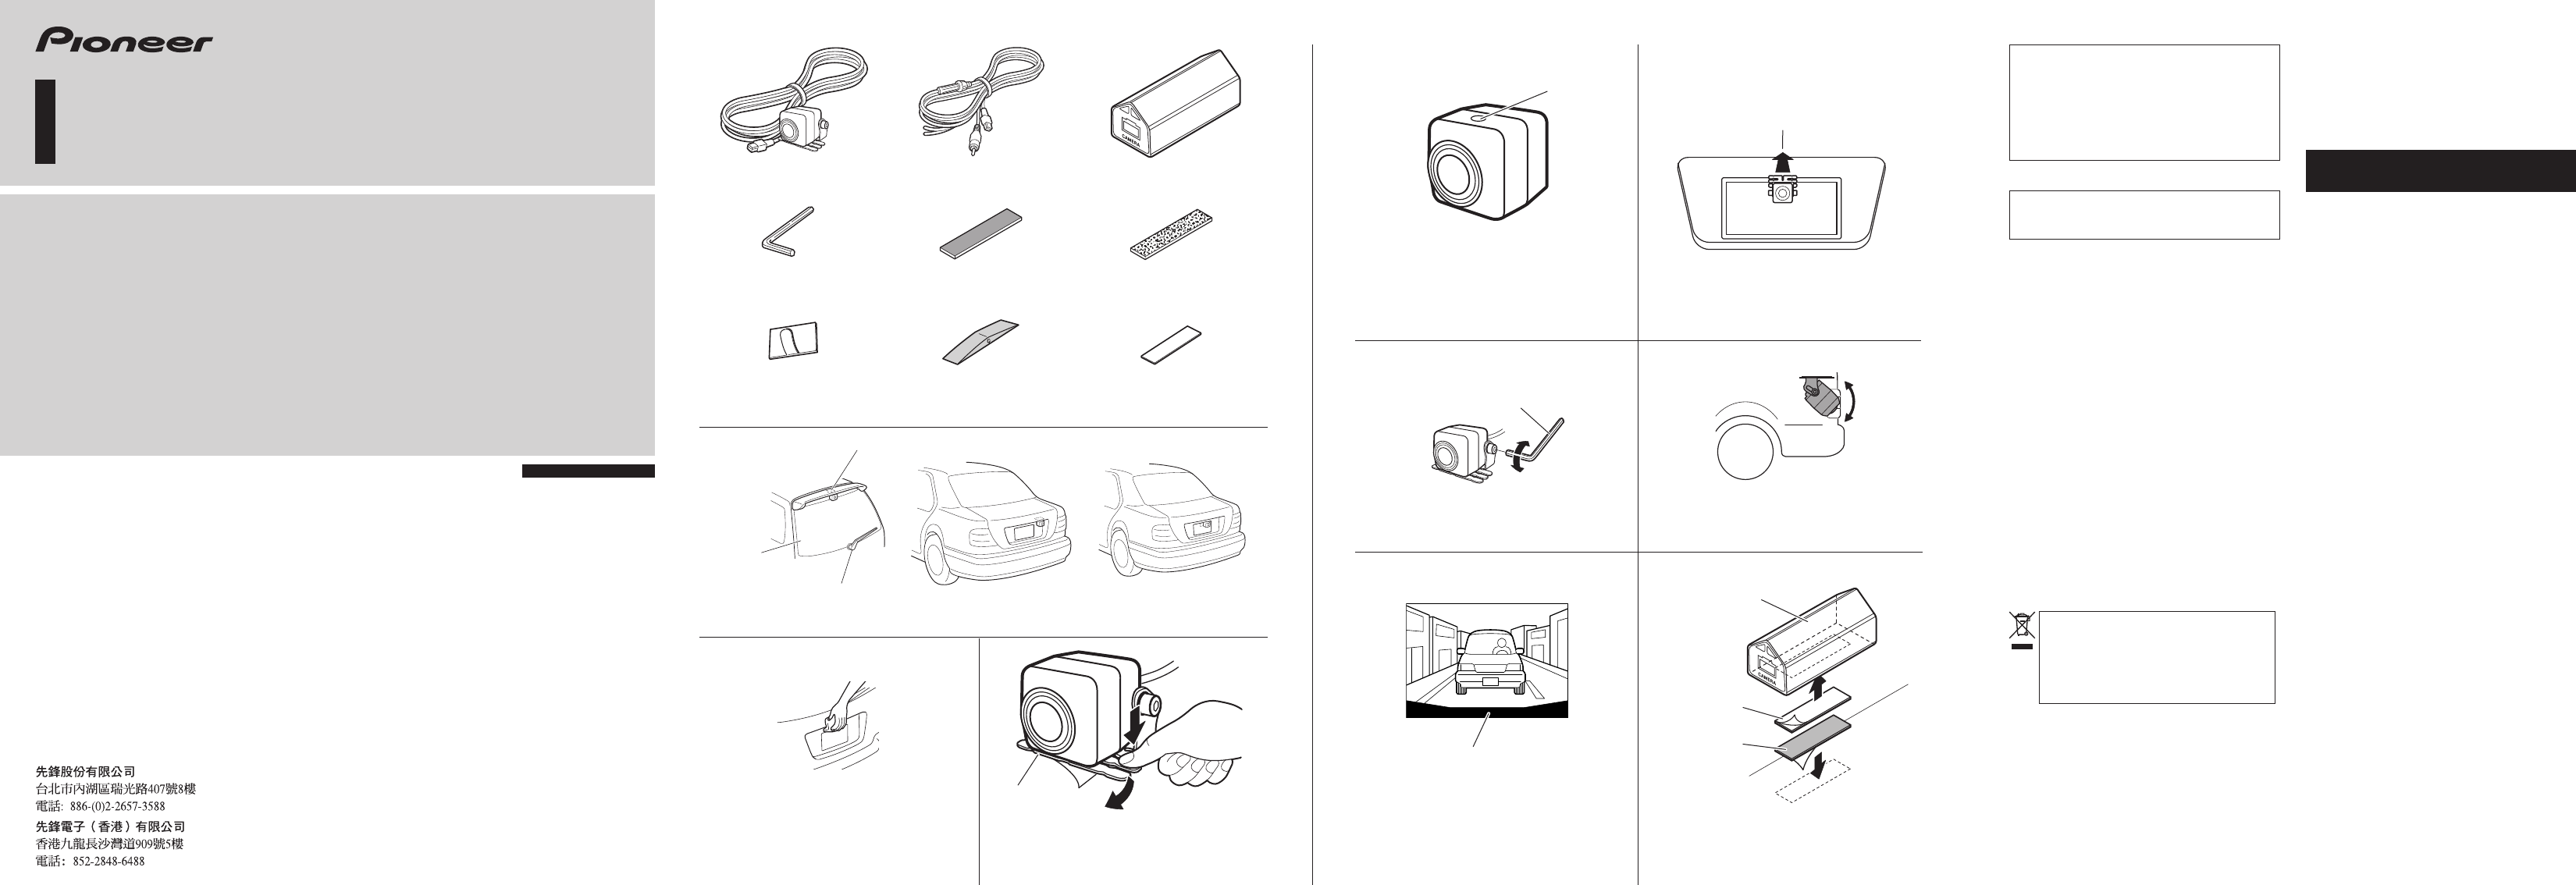
① Glass surface
② Make sure it doesn’t touch the wiper
③ Install on the center part
Fig. 1
Abb. 1
𝖠 Rear view camera × 1 𝖢 Power supply unit × 1𝖡 RCA power supply cable × 1
𝖣 Hexagon wrench × 1 𝖤 Hook and loop fastener
(soft type) × 1
𝖥 Hook and loop fastener
(hard type) × 1
𝖧 Waterproof
pad × 1
𝖦 Clamp × 6 𝖨 Double-sided
tape × 1
Fig. 4
Abb. 4
Fig. 8
Abb. 8
Fig. 6
Abb. 6
Fig. 9
Abb. 9
② Bumper or rear edge of car
① Power supply unit
② Hook and loop
fastener
(hard type)
③ Hook and loop
fastener
(soft type)
① Camera
stand
Fig. 2
Abb. 2
Fig. 3
Abb. 3
This device complies with part 15 of the FCC
Rules.
Operation is subject to the following two
conditions:
(1) This device may not cause harmful interference,
and (2) this device must accept any interference
received, including interference that may cause
undesired operation.
Information to User
Alteration or modifications carried out without
appropriate authorization may invalidate the user’s
right to operate the equipment.
Note:
This equipment has been tested and found to comply
with the limits for a Class B digital device, pursuant
to Part 15 of the FCC Rules. These limits are
designed to provide reasonable protection against
harmful interference in a residential installation.
This equipment generates, uses and can radiate radio
frequency energy and, if not installed and used in
accordance with the instructions, may cause harmful
interference to radio communications. However, there
is no guarantee that interference will not occur in a
particular installation. If this equipment does cause
harmful interference to radio or television reception,
which can be determined by turning the equipment
off and on, the user is encouraged to try to correct
the interference by one or more of the following
measures:
• Reorient or relocate the receiving antenna.
• Increase the separation between the equipment and
receiver.
• Connect the equipment into an outlet on a circuit
different from that to which the receiver is
connected.
• Consult the dealer or an experienced radio/TV
technician for help.
If you want to dispose this product, do not
mix it with general household waste. There
is a separate collection system for used elec-
tronic products in accordance with legisla-
tion that requires proper treatment, recovery
and recycling.
Private households in the member states of the EU,
in Switzerland and Norway may return their used
electronic products free of charge to designated col-
lection facilities or to a retailer (if you purchase a
similar new one). For countries not mentioned above,
please contact your local authorities for the correct
method of disposal. By doing so you will ensure that
your disposed product undergoes the necessary treat-
ment, recovery and recycling and thus prevent poten-
tial negative effects on the environment and human
health.
WARNING:
Handling the cord on this product or cords associated
with accessories sold with the product may expose
you to chemicals listed on proposition 65 known to
the State of California and other governmental enti-
ties to cause cancer and birth defect or other repro-
ductive harm. Wash hands after handling.
IMPORTANT
SAFEGUARDS
• Installation and wiring of this product require spe-
cialist skill and experience. To assure your safety,
please request a specialist technician to install the
unit.
• Do not attempt to heat the surface of the camera
lens or camera lens itself with a lighter and so on
when they have become frozen. This can cause a
malfunction.
• This product is a rear view camera for checking
the view at the rear of a car.
A rear view camera is a camera that provides sym-
metrical images in the same way as rear and side
view mirrors.
• Connection to a TV with an RCA video input is
possible, but confirm whether the TV you use has
a reverse gear connection function.
• This product is designed to supplement the driver’s
rear view, but the camera images do not show all
dangers and obstacles. Be sure to look behind you
when reversing to confirm the view.
• This product features a wide-angle lens, so the
near view is wide and the far view is narrow,
which may create a false sense of distance. Be
sure to look behind you when reversing to confirm
the view.
• Do not wash your car with an automatic car wash
or high-pressure water as it may result in water
entering the camera or the camera falling off.
• Check camera stand installation before driving.
– Are the screws loose?
– Is the camera stand firmly secured?
– If the rear view camera comes loose while you
are driving it may cause an accident.
• This product by itself does not display guidelines.
⑥ Be sure not to hide any part of the char-
acters on the license plate when attaching
the camera.
Fig.5
Abb. 5


 (200 pages)


 Manymanuals.com
 Manymanuals.de
 Manymanuals.fr
 Manymanuals.it
 Manymanuals.pl
 Manymanuals.cz
 Manymanuals.es
 Manymanuals-pt.com
Commentaires sur ces manuels