Pioneer KEH-P4013R Manuel d'utilisateur
Naviguer en ligne ou télécharger Manuel d'utilisateur pour Multimédia automobile Pioneer KEH-P4013R. Pioneer KEH-P4013R User Manual Manuel d'utilisatio
- Page / 6
- Table des matières
- MARQUE LIVRES
Noté. / 5. Basé sur avis des utilisateurs
Installation <ENGLISH>
INSTALLATION MANUAL
MANUEL D’INSTALLATION
30°
5
Fig. 1
Abb. 1
Afb. 1
Fig. 3
Abb. 3
Afb. 3
Fig. 2
Abb. 2
Afb. 2
182
53
1
2
3
4
<KFJLF/00I00000>
KEH-P5010R
KEH-P4013R
KEH-P4010R
KEH-P4010RB
Printed in Portugal
Imprimé au Portugal
<URD-168-A> EW
This product conforms to new cord colors.
Los colores de los cables de este producto se confor-
man con un nuevo código de colores.
Dieses Gerät entspricht den neuen kabelfarben.
Le code de couleur des câbles utilisé pour ce produit
est nouveau.
Questo prodotto è conforme ai nuovi codici colori.
De kleuren van de snoeren van dit toestel zijn gewijzigd.
Note:
• Before finally installing the unit, connect the
wiring temporarily, making sure it is all connect-
ed up properly, and the unit and the system work
properly.
• Use only the parts included with the unit to
ensure proper installation. The use of unautho-
rized parts can cause malfunctions.
• Consult with your nearest dealer if installation
requires the drilling of holes or other modifica-
tions of the vehicle.
• Install the unit where it does not get in the dri-
ver’s way and cannot injure the passenger if there
is a sudden stop, like an emergency stop.
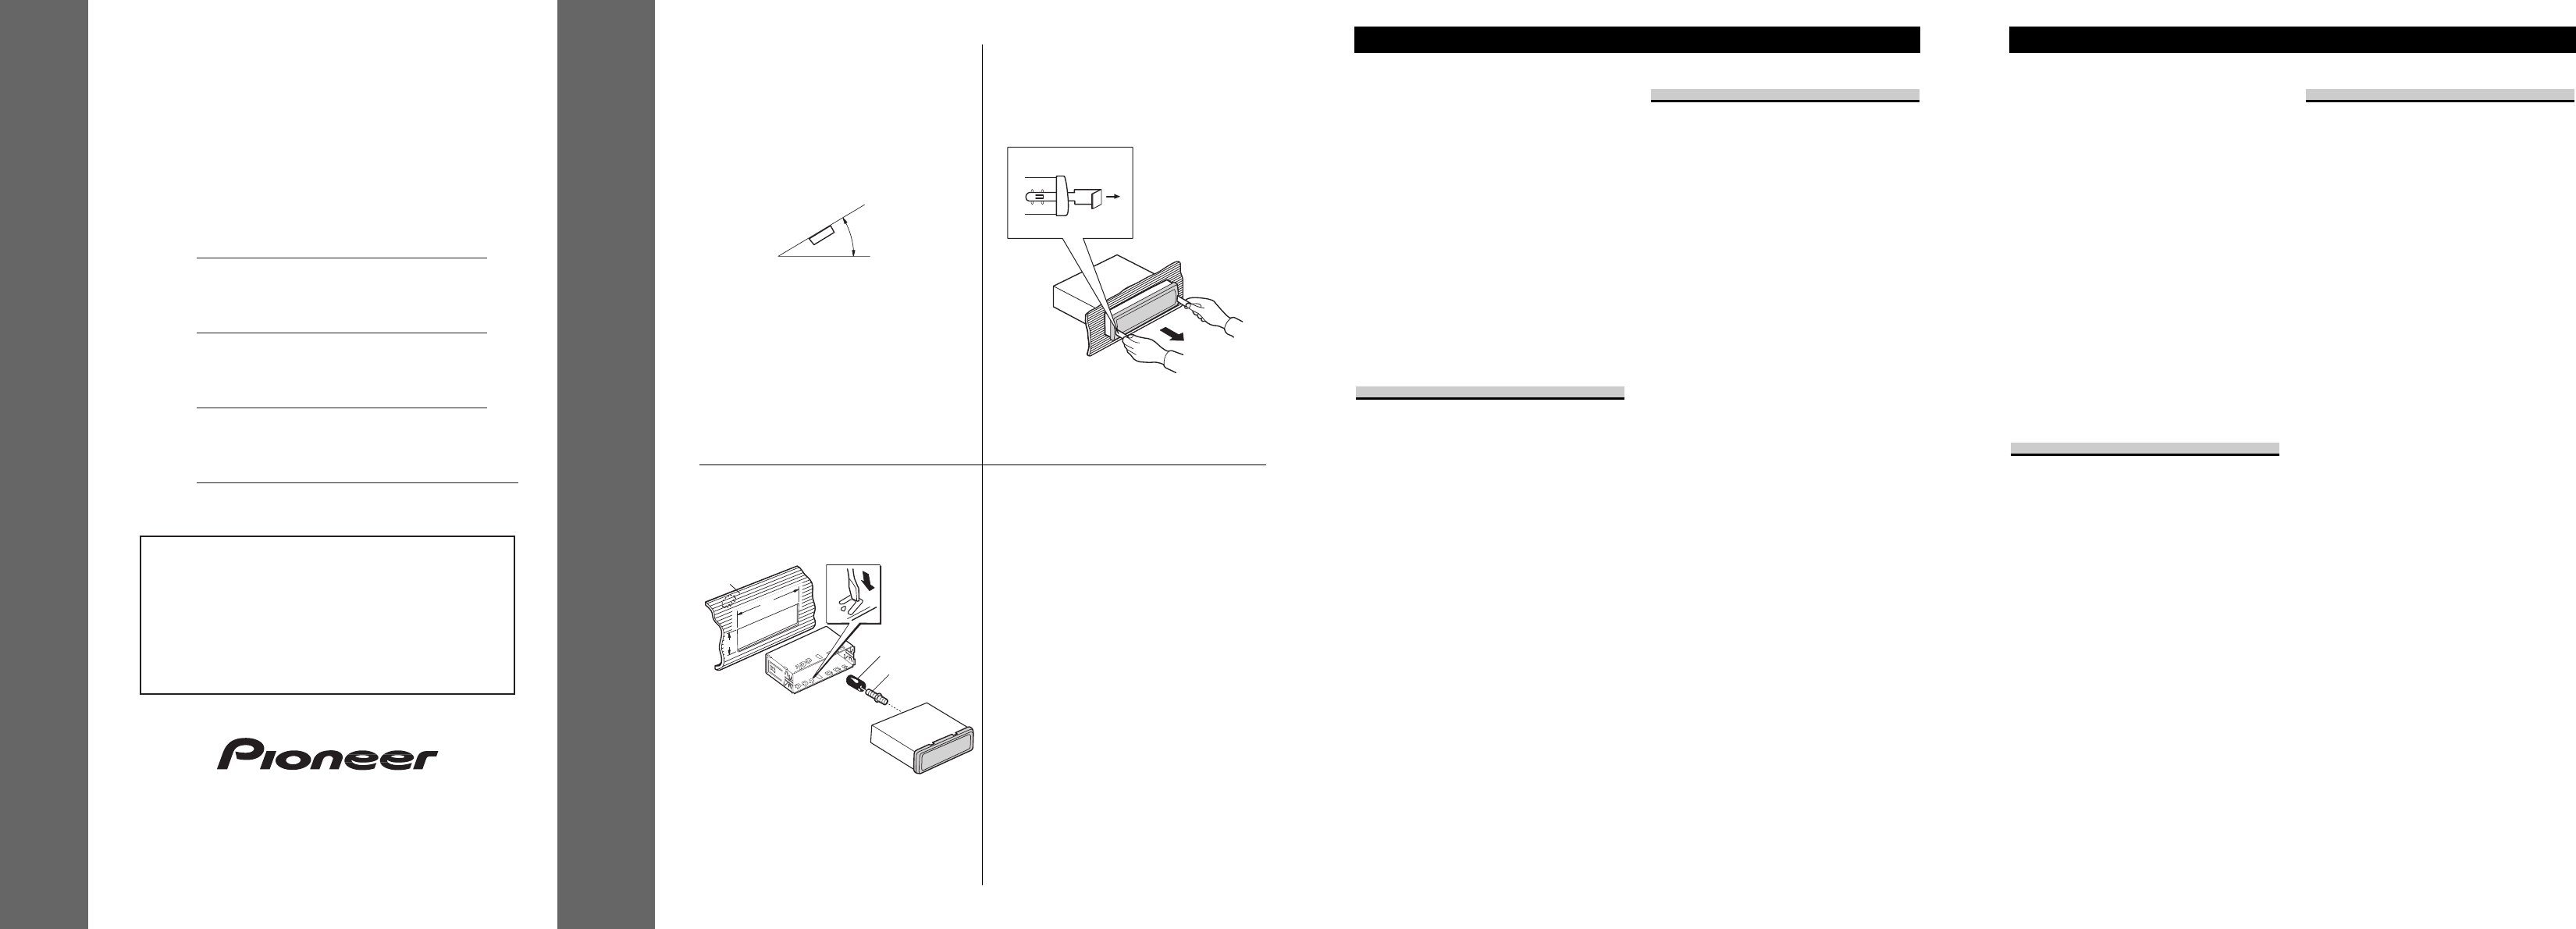
• If installation angle exceeds 30° from horizontal,
the unit might not give its optimum performance.
(Fig. 1)
Installation with the rubber bush
(Fig. 2)
1. Dashboard
2. Holder
After inserting the holder into the dashboard,
then select the appropriate tabs according to the
thickness of the dashboard material and bend
them.
(Install as firmly as possible using the top and
bottom tabs. To secure, bend the tabs 90
degrees.)
3. Rubber bush
4. Screw
Removing the Unit (Fig. 3)
5. Insert the supplied extraction keys into the unit,
as shown in the figure, until they click into place.
Keeping the keys pressed against the sides of the
unit, pull the unit out.
Instalación <ESPAÑOL>
Nota:
• Antes de instalar definitivamente la unidad,
conecte temporalmente el cableado, asegurándose
de que todo está convenientemente conectado y
tanto la unidad como el sistema funcionan cor-
rectamente.
• Utilice únicamente los componentes que se
incluyen con la unidad para garantizar una ade-
cuada instalación. El uso de componentes no
autorizados puede hacer que la unidad no fun-
cione correctamente.
• Consulte a su distribuidor más próximo si la
instalación requiere la perforación de orificios u
otras modificaciones en el vehículo.
• Instale la unidad donde no estorbe al conductor y
no pueda producir daños al pasajero si se produ-
jera una parada repentina; por ejemplo una para-
da en una situación de emergencia.
• Si el ángulo de instalación pasa de 30º respecto a
la horizontal, el rendimiento de la unidad no será
óptimo. (Fig. 1)
Instalación con la arandela de
caucho (Fig. 2)
1. Salpicadero
2. Soporte
Una vez insertado el soporte en el salpicadero,
seleccione las pestañas correspondientes según el
grosor del material del salpicadero y dóblelas.
(Instale la unidad lo más firme posible utilizando
las pestañas inferiores y superiores. Para fijarla,
doble las pestañas 90 grados.)
3. Arandela de caucho
4. Tornillo
Retirar la unidad (Fig. 3)
5. Inserte en la unidad las llaves de extracción sum-
inistradas, como se muestra en la figura, hasta
que suene un “clic” indicando que están en la
posición correcta. Con las llaves presionadas
contra los laterales de la unidad, tire de la unidad
hacia el exterior.
- INSTALLATION MANUAL 1
- MANUEL D’INSTALLATION 1
- Installation <FRANÇAIS> 2
- Connecting the Units 3
- <ENGLISH> 3
- Conexión de las unidades 4
- <ESPAÑOL> 4
- Anschließen der Geräte 5
- <DEUTSCH> 5
- Raccordement des appareils 5
- <FRANÇAIS> 5
- Aansluiten van de toestellen 6
- <NEDERLANDS> 6
- Collegamento degli apparecchi 6
- <ITALIANO> 6
Résumé du contenu
Page 1 - MANUEL D’INSTALLATION
Installation <ENGLISH>INSTALLATION MANUALMANUEL D’INSTALLATION30°5Fig. 1Abb. 1Afb. 1Fig. 3Abb. 3Afb. 3Fig. 2Abb. 2Afb. 2182531234<KFJLF/00I00
Page 2 - Installation <FRANÇAIS>
Einbau <DEUTSCH> Montage <NEDERLANDS>Installazione <ITALIANO>Nota:• Prima di installare l’apparecchio in modo defini-tivo, collegare
Page 3 - <ENGLISH>
• The black lead is ground. Please ground this leadseparately from the ground of high-current prod-ucts such as power amps.If you ground the products
Page 4 - <ESPAÑOL>
Nota:• Esta unidad está diseñada para vehículos con unabatería de 12 voltios y toma de tierra negativa.Antes de instalarla en un vehículo recreativo,
Page 5 - <FRANÇAIS>
Remarque:• Cet appareil est conçu pour les véhicules équipésd’une batterie de 12 volts et d’une masse négative.Avant de l’installer dans un véhicule d
Page 6 - <ITALIANO>
Opmerking:• Dit toestel is ontworpen voor voertuigen met eenaccu van 12 volt met negatieve aarding.Controleer de accuspanning voordat u het toestelmon
Produits connexes et manuels pour Multimédia automobile Pioneer KEH-P4013R
 (2 pages)


 (114 pages)
© 2020, manymanuals.fr. Tous droits réservés | 0.939 s |
 Manymanuals.com
 Manymanuals.de
 Manymanuals.fr
 Manymanuals.it
 Manymanuals.pl
 Manymanuals.cz
 Manymanuals.es
 Manymanuals-pt.com
Commentaires sur ces manuels